8.31.2011

Pepperoni Piggies!

You all know what time it is? It's time to CALL. THOSE. HOGS!!!!!!!!

I could not be more excited that Razorback football is 3 days away! And high school football at our house starts in 2 days (Go Badgers!). I mentioned my Interest in Pinterest in a previous post and wanted to share one of the first recipes I made from this amazing website, Pizza Piggies

picture from www.cafechocolada.blogspot.com

It was originally posted on a blog called Cafe Chocolada, but the blog is recently open to invited readers only. Hmpphh! Good thing I was able to check out this recipe before viewing access was denied!

First, choose your dough. I used Bisquick Heart Healthy to make my dough because that's what I always use to make pizza dough; HOWEVER, I would not recommend this. 1) it was too bread-y  2) I couldn't roll it out thin enough so it was a little too thick for my taste. So...I would suggest using a refrigerated pizza dough or crescent rolls. Maybe even a pie crust, depending on what you're filling it with.

ROLL the dough out very thin and choose your "cutter". I used a wine goblet. You might want to use a different object to create a larger circle (plastic cup) if you want to place more "filling" in between your layers. Totally up to you!

Cut out a bunch of circles for the faces of the piggies (2 circles per piggie). 

Find a smaller "cutter" and cut out smaller circles to use for the piggies' snouts and also to use for the ears. (1 circle for each snout, 1 circle will make 4 ears) I used a small shooter shot glass for these smaller circles.

You could also use a bottle cap. Anything about this size, really.

Once you have all of your big circles cut out, make sure you have an even number so that you have one circle for the bottom and one circle for the top of each piggie (since you will be sandwiching your filling).
Spread each circle with ~1Tbsp pizza sauce (use your judgement). You don't want too much because then you won't be able to press the two circles together without the sauce spilling out.

Top the sauce on each circle with 1-2 pepperonis. 

Sprinkle the cheese on top of the pepperonis (again, don't overdo it). Too much will spew out once you bake them in the oven!

Top each circle with another large circle.

Press the edges so that they stick together (sort of like making a pie). This can get messy if you put too much filling in them. 

For the snouts, use your smaller circles (1 for each piggie). Take a fork/toothpick and make 2 slits in the middle of each circle for the nostrils. You can leave it at that, or use rosemary sprigs (I used caraway seeds) to make the nostrils more bold. Use egg wash to help the nose/ears stick to the piggies' faces.

For the ears, cut the smaller circles (same size as the circles used for the snouts) into quarters and place on the piggies. I did mine up-side-down, but oh well!
 Brush the faces with egg white. Top with peppercorns for eyes. (Totally edible and tasted great!)
Bake @ 350 degrees for ....ummm, this is horrible, but I can't remember the baking time. And since I don't have access to view this blog anymore, just watch them closely. Should take around 8-15 min.

As you can see, some of the cheese & sauce will spill out as they rise. This is okay. Just wipe it up!


 Dig In! I had to dip mine in more pizza sauce because I LOVE it! It also made mine taste a little better since they were so bread-y from the dough I chose to use.

Aren't they so cute! I will say it takes a little time to prepare them, but the options for fillings/seasonings are endless! These will be making it to the tailgate for sure! Feel free to comment if you have any questions or if you end up trying them. I'd love to hear how they turn out for you!!

8.09.2011

Buffalo Blue Grilled Cheese

I know I mentioned at the end of my last post that I would share my Pepperonie Piggies recipe next, but I had these amazing sandwiches after church the other day and I just HAD to share the recipe. 

Raise your hand if you love buffalo wing sauce? (meeeeeeeeeeeee). I love anything that's vinegar-y and tangy. Everytime I go out to eat (rare occasion) or look up a recipe I'm drawn to the word buffalo because of my obsession with the kick and flavor it gives. I was "pinning" recipes on Pinterest (you can read about Pinterest HERE) and came across the most brilliant grilled cheese sandwich I've ever laid eyes on. 

The original recipe came from the blog, Grilled Cheese Social. It has a lot of ingredients and I wanted to simplify, as well as alter it to my preference and things I had on hand. You can always expect me to alter the recipe!  

*NOTE: this is by no means a "healthy" recipe, nor did I do much "healthifying" of the ingredients list.  


Is your mouth watering, yet? Here's how I prepared mine...

Buffalo Blue Grilled Cheese
-6 slices of Sourdough Bread (any thick, white bread will do)
-butter, for cooking the sandwiches in the skillet
-2 tbs ranch dip/dressing
-2 tbsp crumbled blue cheese (we used 1/4 cup and it was a little much)
-1/4 C shredded cheddar
-2 cooked, shredded chicken breast halves
-1/4 cup wing sauce (I used Kroger's Spicy Garlic Wing Sauce)

Directions:
1. Mix ranch, blue cheese, & cheddar in a small bowl until smooth consistency. Spread onto each slice (all 6) of bread.
2. In a medium bowl, mix shredded chicken and wing sauce until coated. Evenly divide chicken mixture among 3 slices of bread, mounding directly on top of the cheese mixture. Top with remaining 3 slices of bread (already spread with cheese mixture).
3. Butter outsides of each sandwich and place on a skillet/stovetop grill on medium-high heat until golden brown on each side.
4. ENJOY!!!
 

Here's what they looked like on the grill before I topped them off with the other slice of bread


This made 3 sandwiches for us...and I'm glad that was it, otherwise I would've kept eating it. It was that good. Go on, you know you want to go make one RIGHT NOW. You won't be sorry that you did!!

8.07.2011

Italian Food

Like I said, I've still been busy in the kitchen during my absence from blogging. I've tried some great new recipes (and new recipe hosts, too) that I love and wanted to share. These Italian recipes come from Giada De Laurentiis, host of Everyday Italian and Giada at Home, on foodnetwork.com. One of my FAVORITE recipes so far is her tomato sauce, used in the first recipe below. You WILL NOT be disappointed! Trust me. It is very light, but has a creamy texture and I plan to make an extra batch to freeze for later!

Simple Tomato Sauce:

  • 1/2 cup EVOO (extra virgin olive oil)
  • 1 small onion, chopped
  • 2 cloves garlic, chopped
  • 1 stalk celery, chopped
  • 1 carrot, chopped
  • Sea salt and freshly ground black pepper
  • 2 (32-ounce) cans crushed tomatoes
  • 2 dried bay leaves
  • 4 tablespoons unsalted butter, optional
In a large casserole pot, heat oil over medium high heat. Add onion and garlic and saute until soft and translucent, about 5 to 10 minutes. Add celery and carrots and season with salt and pepper. Saute until all the vegetables are soft, about 5 to 10 minutes. Add tomatoes and bay leaves and simmer uncovered on low heat for 1 hour or until thick. Remove bay leaves and check for seasoning. If sauce still tastes acidic, add unsalted butter, 1 tablespoon at a time to round out the flavors.

Add 1/2 the tomato sauce into the bowl of a food processor. Process until smooth. Continue with remaining tomato sauce.* I used my blender here.

If not using all the sauce, allow it to cool completely and pour 1 to 2 cup portions into freezer plastic bags. This will freeze up to 6 months.

Yield: 6 cups

And now on to three of my favorite recipes from Giada. I've tried all three of the following dishes and loved them, but of course, I made my own modifications. I included pictures of the ones I remembered to snap while I was making the dishes, but some of the pictures, obviously, are courtesy of foodnetwork.com. Enjoy!


Spaghetti with Olives & Tomato Sauce:
  • 1 pound dried spaghetti
  • 1/4 cup olive oil
  • 1 1/4 cups mixed olives, pitted and halved (I used black and pimento)
  • 1/2 tablespoon red pepper flakes, plus more if desired
  • 3 cups tomato sauce, recipe follows
  • 1/2 cup grated Parmesan
  • 1/2 cup basil leaves, shredded (I used dried basil, a couple teaspoons)
 I served with baked chicken seasoned with Italian herbs

Close-up shot if this goodness!

In a large pot, bring 6 quarts of salted water to a boil. When water comes to a boil, add pasta, stirring constantly for the first minute to help prevent spaghetti from sticking together. Cook until al dente, about 8 to 10 minutes. 

In a large saute pan, heat oil. When almost smoking, add olives and red pepper flakes. Saute for 3 minutes over medium high heat. Reduce heat to low and carefully pour in tomato sauce and simmer for 10 minutes.

Drain pasta in a colander, reserving 1/4 cup pasta water. Add pasta to the sauce and toss to coat completely. Add pasta water if you need to thin out the sauce a bit. Plate pasta and sprinkle with Parmesan cheese and basil.

Click HERE to print this recipe.


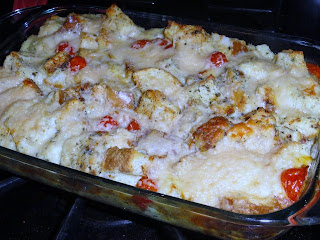
Tomato-Basil Bread Pudding:
Filling:

  • Butter, for greasing the baking dish
  • 1/2 (8 ounces) multi-grain loaf, cut into 3/4-inch cubes (I used sourdough bread)
  • 3 tablespoons olive oil
  • 1 large or 2 small shallots, thinly sliced (I omitted these, for personal preference)
  • 2 cloves garlic, minced
  • 12 ounces cherry or grape tomatoes, halved
  • Kosher salt and freshly ground black pepper
  • 1 packed cup chopped fresh basil leaves (I used dried)
  • 1 1/2 cups (6 ounces) shredded Parmesan

Custard:

  • 6 large eggs, at room temperature
  • 1 cup whole milk (I used skim)
  • 1 teaspoon kosher salt
  • 1/2 teaspoon freshly ground black pepper


Directions:

Filling: Put an oven rack in the center of the oven. Preheat the oven to 375 degrees F. Butter a 9 by 13 by 2-inch glass baking dish. Add the bread cubes and set aside.

In a large skillet, heat the oil over medium-high heat. Add the shallots and garlic. Cook, stirring constantly until fragrant, about 1 minute. Add the tomatoes and season with salt and pepper, to taste. Cook until slightly soft, about 2 minutes. Remove the pan from the heat and stir in the basil. Pour the tomato mixture and Parmesan cheese over the bread cubes and combine well.

Custard: In a large bowl, beat the eggs, milk, salt, and pepper together until smooth. Pour the custard over the bread mixture and gently toss to coat. Bake until slightly puffed and golden, about 25 to 30 minutes. Remove the pudding from the oven and let cool for 5 minutes. Cut into wedges and serve.

Click HERE to print this recipe.


Linguine with Avocado & Arugula Pesto:
  • 1 pound linguine pasta
  • 2 medium avocados, halved, peeled, and seeded (about 12 ounces total)
  • 3 cups baby arugula leaves (3 ounces) (I had spinach, so I used it, instead)
  • 1 packed cup fresh basil leaves(I couldn't find this at my local store, so I used a few tsp dried basil)
  • 3 tablespoons fresh lime juice (from 2 large limes)
  • 2 cloves garlic, peeled and smashed
  • 1 teaspoon kosher salt
  • 1/2 teaspoon freshly ground black pepper
  • 1 cup grated Parmesan (4 ounces)
  • 1/2 cup sliced almonds, toasted (I omitted these) 


Directions

Bring a large pot of salted water to a boil over high heat. Add the pasta and cook until tender but still firm to the bite, stirring occasionally, 8 to 10 minutes. Drain and reserve about 1 cup of the pasta water. Place in a serving bowl.

Using a spoon, scoop out the flesh from the avocados and place in a food processor. Add the arugula, basil, lime juice, garlic, salt, and pepper. Blend until smooth.

Pour the pesto over the pasta and toss together. Add the cheese and almonds and toss together until coated, adding the pasta water, as needed, to loosen the sauce.

Click HERE to print this recipe.


I sure hope you enjoy these Italian dishes as much as I did! Next, I'll be sharing my recipe for Pepperoni Piggies. All you Hog fans be sure to check back in and get the recipe before football season starts. You'll want to take this one to your tailgate!!!

Ciao!

8.06.2011

My interest in PINTEREST!!!

Hey guys! We sure have been hot down here in Arkansas. In fact, the other day we reached a record high of 114 degrees. Geeeez! I've almost given up cooking it gets so hot in our kitchen. I said almost...So sad!! So I've been doing things like this...

 homemade ice cream in a zip loc
milk + vanilla + sugar + ~10 minutes of elbow grease...So worth it!

Lakin' it up!

Since I mentioned the above ice cream trick, I figured I'd introduce you to my newest obession. I've been entertaining myself indoors by spending much of my time on Pinterest (www.pinterest.com). Have you heard of it? If not, you've GOT to check it out. ASAP. I discovered it when I saw a friend post a picture from Pinterest onto facebook. So, I clicked to see what it was and fell.in.love. No lie, I spent the next 24 hours on the dang thing after I discovered it! So what is it, you ask? It's basically a virtual pin board for you to keep a collection of your favorite ideas. It's absolutely wonderful. And the great thing is that you can create an account for FREE that is linked to your facebook account, so all of your facebook friends can follow your pin boards, and you can follow theirs to see what ideas they've pinned. I love sharing ideas!! Just to give you a taste of some of my pin boards....


 entire chalkboard wall I hope to have in my future home!

 make your own egg McMuffins by baking eggs in muffin tins...duh!

 this gorgeous front porch that I can only dream about for now

 make-ahead crock pot meals to freeze in a zip-lock...can we say time & money saver!?

 home bar made from an old dresser...I'd love to make this!

 DIY headboard from an old door. Love it!

If I had known about this 2 years ago when I was planning my wedding....it would have been amazing. When I was planning, I was ALWAYS saving pics of ides I liked for my wedding. Flowers, table scapes, shoes, bridesmaids dresses, hair styles, wedding cake designs, etc. And I would save them to their respective folders on my computer, but then I'd have the hardest time remembering where I had originally found the pictures on the web. Luckily, Pinterest lets you pin pictures of things/ideas you like to your virtual pinboards, and they are always there when you log in/out. No taking up space on your computer. You can "re-pin" things that have already been "pinned" onto Pinterest by other users, OR you can "pin" a picture from any of your favorite websites and it will pin on your pinboard. AND, when you click on the image of anything you've pinned (a picture of a recipe, for example), it takes you to the blog/website where the recipe/idea is listed or where it originated from. Genius! Here are more of my favorite things I've pinned.......

 cake stand made from dollar store finds (plates, candle sticks)...to make for a wedding shower?

 make your own sugar scrub. Great gift to have on hand!

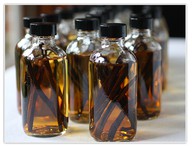
 vodka + vanilla beans=homemade vanilla extract

 I've already made these cute little Pepperoni Piggies. For sure making again for the tailgate this fall!

 a recipe to make your own oatmeal cream pies...dangerous!

 etch your glass bakeware with your name to make sure you get it back when you take casseroles to pot lucks

 out of taco seasoning? Look in your spice cabinet and make your own!

 genius storage idea for pots/pans that I envy!

There are so many different things on this site and you can categorize them however you like! I have a pin  board for recipes, cute entertaining ideas, fashion (nails, clothes, jewelry), interior design ideas, photography, and my very favorite pinboard, possibly my most FAVORITE thing about pinterest, is my DIY (do it yourself) pin board, which I've named "Intelligent Ideas." GUYS...I've learned SO many neat ways to do things an "easier" way than usual simply due to the fact that other Pinterest users have "pinned" these ideas onto Pinterest and I was able to take these ideas and "re-pin" them to my boards to try for myself. Things like how to make your own headboard, bookshelf, etc. They all come with instructions, too! Other shortcuts are shared to make things easier on yourself, and who is opposed to that!? How to antique paint furniture, make decorations for holidays, use household solutions like toothpaste or vinegar for things you didn't know you could use them for, and TONS of organization and storage tips using unexpected items. It's so hard for me to describe in words how many great tips I've received from this site. I'll leave you with some final images of my favorites from Pinterest...

 how to make no-sew striped curtains

 I WISH I had this walk-in closet with washer/dryer 

 kids kitchen made from old dresser...cute!

 make your own chalkboard paint in whatever color you'd like!

and this dreamy pool house

Ok, I think you get it now. It's really awesome and I'm super addicted. I'll shut up now and you can go check out the website! Have a great rest of the weekend!!

8.05.2011

Piper

TGIF! I hope everyone had a great week. Ours was okay, other than the fact that we were among the 10,000 people in Benton who lost power on the record-breaking heat wave day (114 degrees, y'all!). Needless to say, we were very blessed to only be without power for ~24 hours and were able to head to Arkadelphia and stay with my parents.

As promised, I'm dedicating a post solely to my new niece, Piper Addelyn King. She was born on May 23, 2011 in Arkadelphia, AR. We waited all day for this little girl to arrive! The nurses had never seen so many family/friends present for the birth of a child. We took up the entire waiting room + hallway...mostly Kelli's family. Piper was due in at the beginning of June, but the doctor decided to induce, and we're so glad he did, because she weighed 8 lb 1 oz and was 20.5 inches long. Not to mention her mother stands just over 5 feet tall and weighed 95 lb before she was pregnant. Hats of to Kelli for delivering this big baby!!

The delivery went smoothly and everyone was so happy to finally meet this precious baby girl. Only one thing was missing. Piper's daddy, Austin (my brother). He was away for military training during the end of Kelli's pregnancy so it was so sad that he couldn't be there, but he had all the friends/family you could imagine there to support him. Originally, the military told us they would notify him immediately when Piper was coming and they would fly him home. Yeah, right! He was in the middle of a desert for almost a week with no communication. He returned to base a few days after Piper was born and that is when he was told about his baby girl. Luckily, training ended that week and he flew home to surprise Kelli and Piper on her 5th/6th day of life (he got home around midnight).

 mom, Kelli, & me at the hospital

 mom, dad, Piper and me right after she was born

 first time I got to hold her-they hadn't even cleaned her off yet!


Most of you know that I love to take lots of pictures, and this little one only intensifies that effect! I'm so glad they live close and I've been able to see them every few weeks to watch Piper grow :)


 One week old :)

 Uncle Derek meeting her for the first time

 Proud daddy

soo cute all bundled up! Going to lunch for my 24th bday


She changes so much every time I see her. I was surprised that the first week of life her eyes were open so much of the time. She loves to look around and especially loves to look at the fan. She makes some googly faces, too, and they are hilarious!


4 weeks old. Sleeping with Aunt E

 Sleeping in the same bassinet Austin and I used

 she was looking at our dog in this pic, too cute!

 love when she smiles! 

her little feetsies :)


As you'll see in a minute, I've reeeeaaaly been trying to capture her funny faces and smiles. I've only been successful on a few attempts, though! (I'm not working with the best camera, people!)

 6.5 weeks old 

 she had on a purple tutu that got messy, so she changed into a pink one!

 love her little mouth and hands!

favorite position to be held....also, she makes the daintiest hand gestures!


My first time to see her in a dress :) I loved it! She won't keep a bow on her head too often, so I loved seeing her all girlied up!

 8 weeks old

 her yawns are precious, what baby's aren't?

 trying to show off her whole dress

This chair works wonders...sleepy girl!

This week I got to see Piper and she babbled the entire time! I caught some of it on video and I wanted to share! She is was 10.5 weeks and 12 lb 12oz and 24 inches at her most recent visit. Growing so fast!

Well, since I can't get the video to upload onto my blog (grrr), you can view it HERE.


I can't wait to share more as she keeps growing! I hope you enjoyed :)